Airflow Certification Crash Course
We’ll learn everything we need to pass the certification
Agenda
- What to expect for the Certification
- Features of Airflow need to pass the exam
- Sneakpeak of Airflow 3 features not covered in the exam
- Quick test
What is the Certification?
It is the Apache Airflow Fundamentals
- Format: 75 multiple-choice questions
- Time: 60 minutes
- Passing score: 70% (53 out of 75)
Topics included are:
- DAG basics
- Dag scheduling
- Airflow components
- Variables
- Connections
- XComs
- Taskflow API
- Airflow UI
- DAG Debugging
Basics
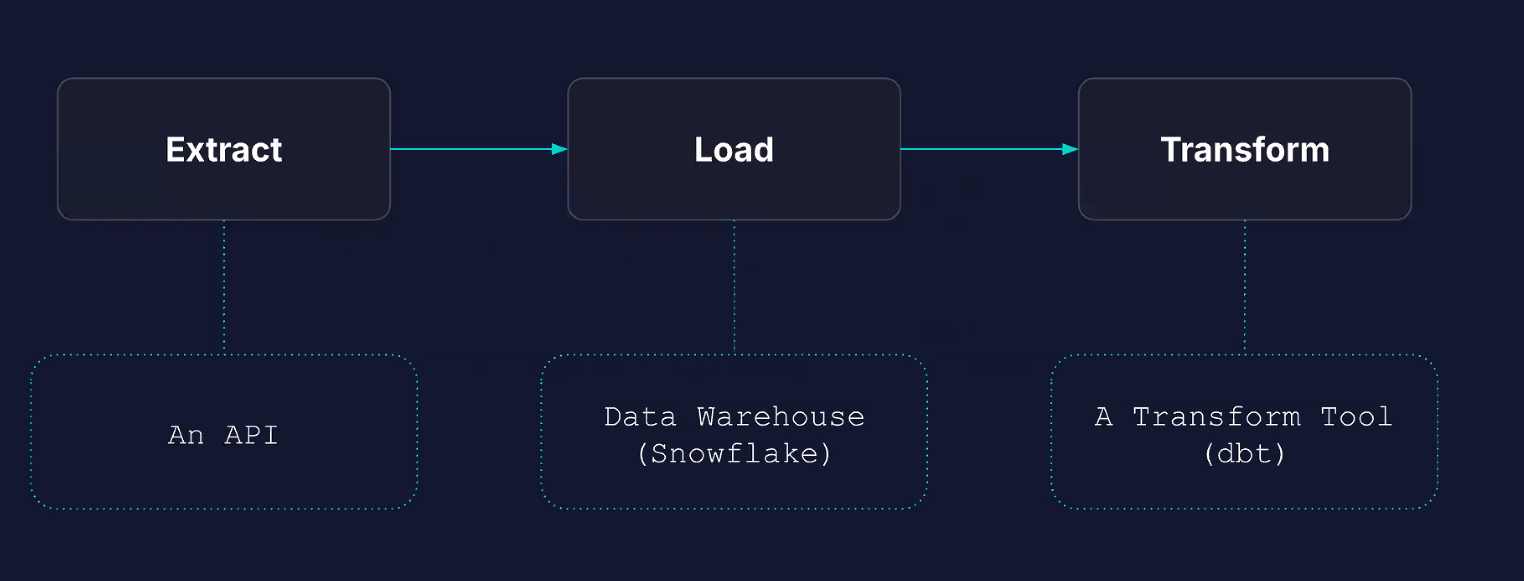
Airflow is the open source standard for Workflow Management.
Airflow Providers
The core airflow package is the package that brings all the core features of Airflow. If we want to interact with Snowflakes, Postgres, etc we need to install providers. These providers give us access to specialized hooks and operators.
Components
Airflow has the following components:
- API Server: FastAPI server serving the UI and handling task execution requests
- Scheduler: Heart of Airflow; Schedule tasks when dependencies are fulfilled
- DAG File Processor: Dedicated process for parsing DAGs
- Metadata Database: A database where all metadata are stored (Postgres database)
- Executor: Defines how tasks are executed and on which system. It is part of the scheduler. It DOESN’t execute the task itself
- Queue: Defines the execution task order; it is also part of the scheduler
- Worker: Process executing the tasks, defined by the executor
- Triggerer: Process running asyncio to support deferrable operators
How they work
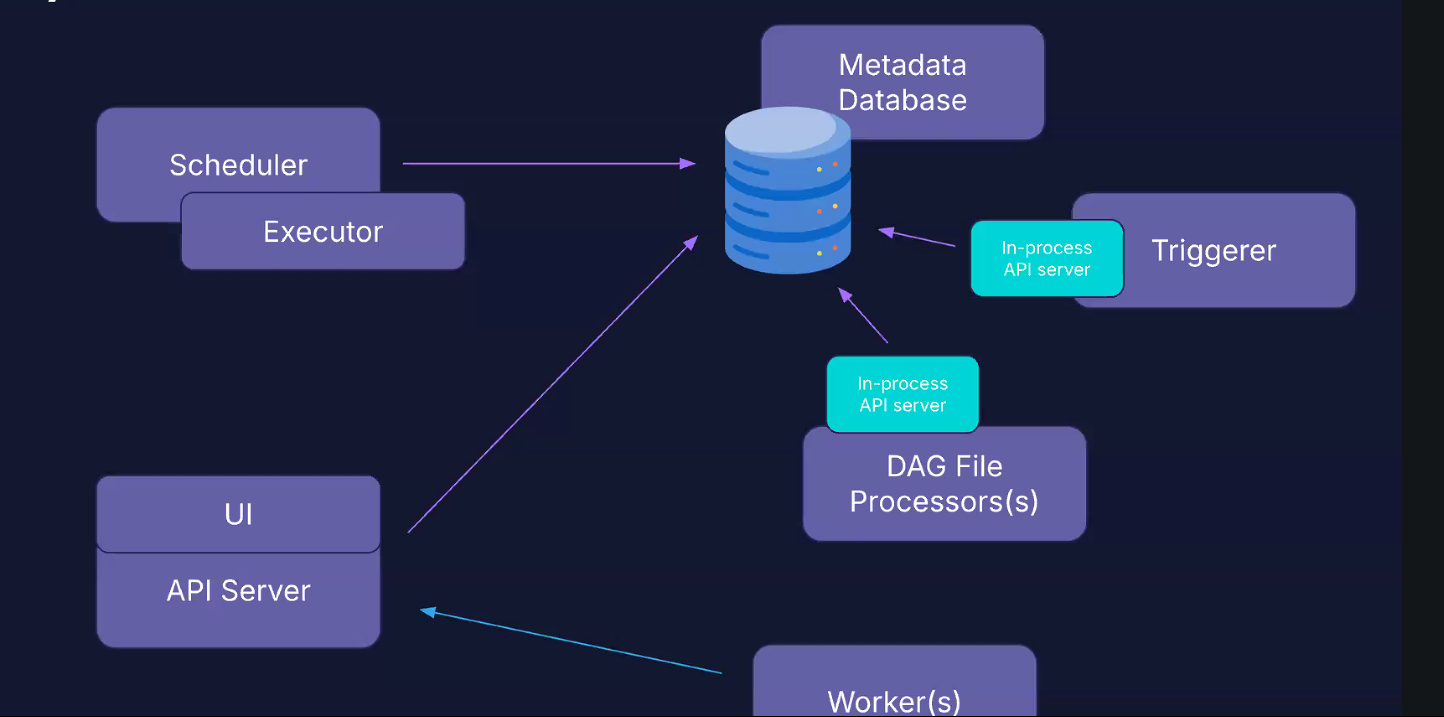
The workers go through the API server to pull the task they have to execute; they do not interact directly with the metadata database. This allows us to run the workers in different cluster than the database.
The API, scheduler, triggerer and DAG processor interact with the metadata database.
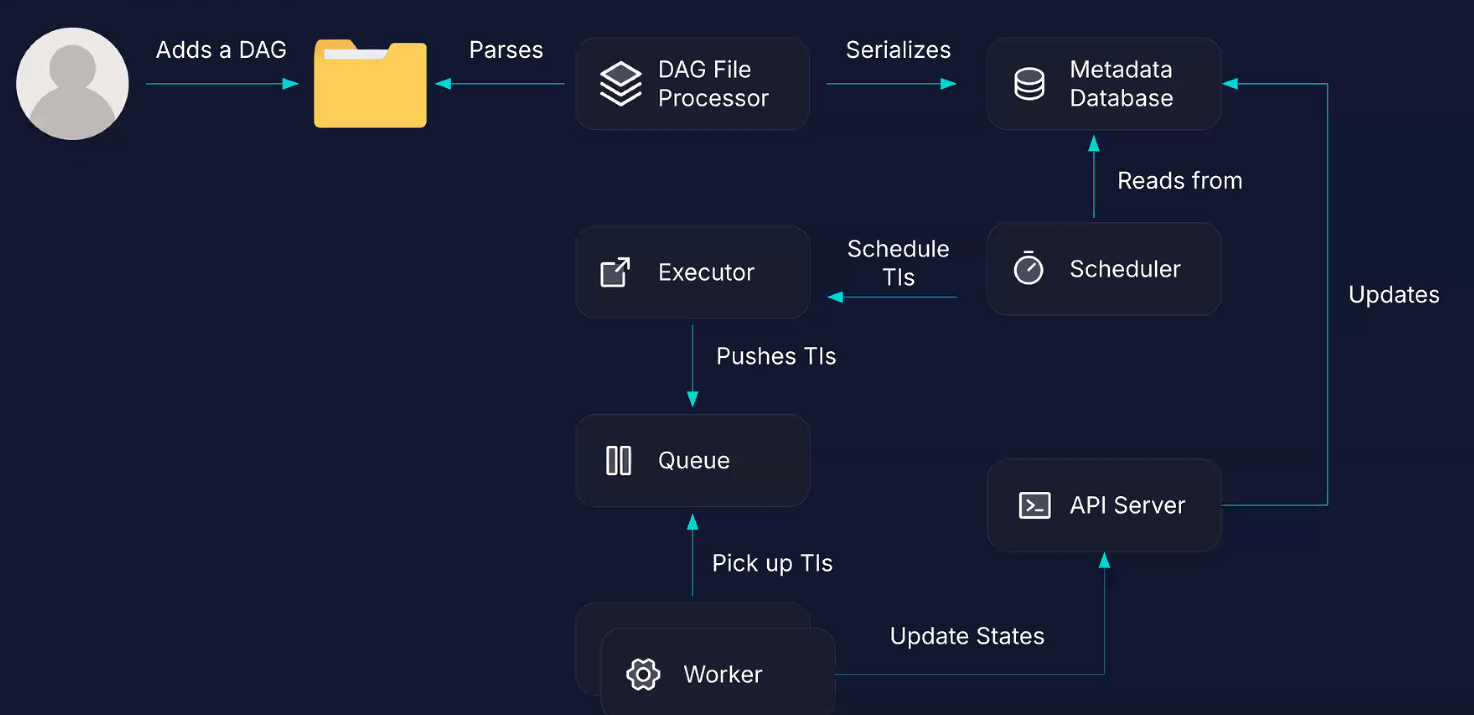
We add a DAG to the DAG folder. The processor processes every 5 minutes the DAG folder for new DAG files; It serializes the DAG file into the metadata database, and the scheduler reads from the database, and check if there is anything to schedule. The task instances scheduled are passed to the Executor, which pushes it to the queue and is assigned to a worker. The worker updates the state to the API server, which updates the metadata database.
Old DAG files are updated every 30 seconds.
Defining a DAG
We have three ways to define a DAG: taskflow API, context manager, and classes (old way)
Let’s use the Taskflow API:
 1from airflow.sdk import dag, task
 2from airflow.providers.standard.operators.python import PythonOperator
 3from airflow.providers.standard.operators.bash import BashOperator
 4
 5
 6# name of the function is the DAG ID of the DAG
 7@dag(schedule=None, description="A Dag that runs manually")
 8def my_dag():
 9  task_a = PythonOperator(task_id='a', ...)
10  task_b = BashOperator(task_id='b', ...)
11
12  task_a >> task_b  # dependencies
At the end of the DAG file, we have to explicitly call the dag defined with the taskflow API:
1my_dag() 1# OLD WAY
2from airflow.model import DAG
3
4dag = DAG(...)
5PythonOperator(dag=dag, ...)
6
7# RECOMMENDED
8from airflow.sdk import DAG
9
10with DAG(...):
11 PythonOperator(...)
12
13# OR
14from airflow.sdk import dag, task
15
16@dag(...)
17def my_dag():
18 @task
19 def my_task(...):
20 ...
21
22my_dag()To define dependencies, we use the bitshift operator: >> or <<; we can also use chain, linear_chain, etc
NB: this WILL be asked
1# this doesn't work
2[t1, t2] >> [t3, t4]
3
4# this works
5chain([t1, t2], [t3, t4])
DAG scheduling
A DAG run has the following properties:
- state: final DAG run’s state
- DAG ID: dag id of the dag triggered
- logical date: the date when the DAG runs
- start date
- end date
- duration
- run ID
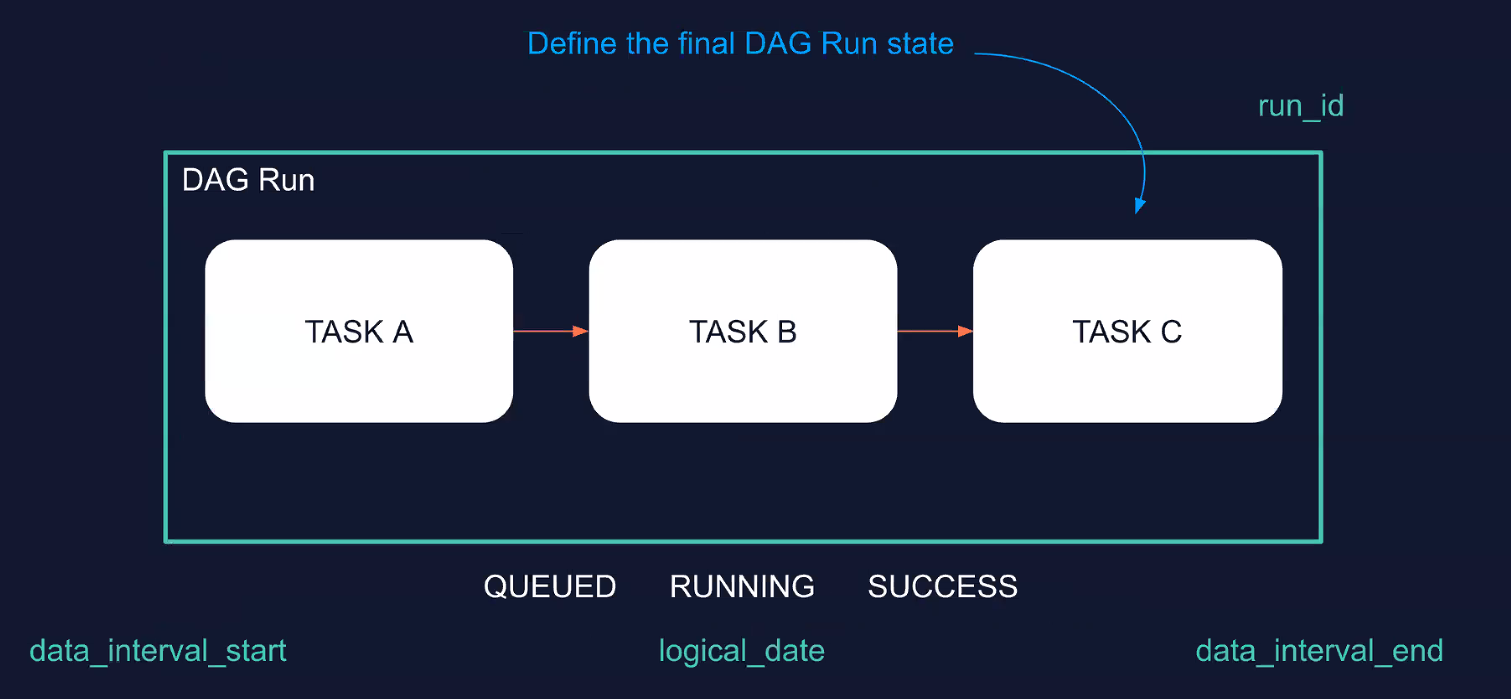
A DAG run can be either Queued, Running or Success/Failed.
You can have multiple DAG runs for the same DAG.
In airflow 3, if you schedule a DAG to start at 10AM, and to run every 10 minutes, it will do exactly that. In Airflow 2, the first DAG run would have started at 10:10am. Essentially the wait time starts at 10am, while in Airflow 3 the wait time starts after the DAG run that starts at 10am.
Features
XCOMs
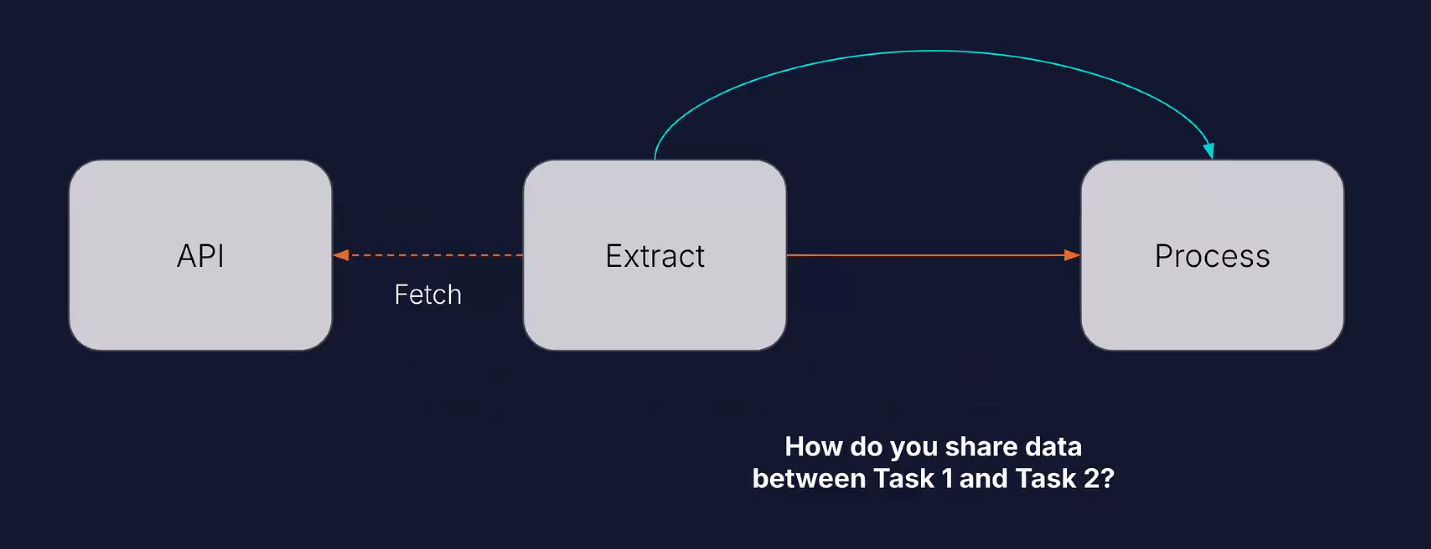
Sharing data between tasks.
Let’s say task1 fetches data with an API, and then task2 needs to process the data. We can accomplish this through XCOMs.
An XCOM is like a box with the value you want to store in it. You identify the XCOM with a key, and then you push it to the metadata database.
1ti.xcom_push(key='my_number', value=23)
2ti.xcom_pull(key='my_number')
You can do this explicitly with TaskFlow:
1val = task_a()
2task_b(val)
XCOM can only deal with small amounts of data, (1GB on Postgres, 2GB on SQLite, 64MB on MySQL). Data must be JSON-serializable. It is mainly used to pass data between tasks and DAGs.
NB: an XCOM is defined by its id, task_id and dag_id.
Variables
Storing constant data.
Let’s assume we have different tasks that use the same API but different endpoints. We don’t want to write the same API URL for each task. We can then create a variable with two fields, the URL and the key to connect to API.
The idea of the variable is to store a value that can be shared across DAGs and Tasks.
Do not store credentials in variables. For that, use Connections.
Variables have a unique key, a value (JSON serializable) and a description.
We can create variables in different ways:
- Airflow UI
- Environment variables:
AIRFLOW_VAR_MYREGULARVAR='my_value'creates a variable with keyMYREGULARVAR, and value'my_value'; however is not visible in the airflow UI;AIRFLOW_VAR_MYJSONVAR='{"hello":"world"}'creates a json variable - Airflow Rest API
- Airflow CLI
- Programmatically inside the DAG code via the Variable class (don’t do that)
Some keywords are detected as sensitive and are automatically hidden in the Airflow UI and logs:
- access_token
- api_key
- apikey
- authorization
- passphrase
- passwd
- password
- private_key
- secret
- token
- keyfile_dict
- service_account
Connections
Connect tools to Airflow
If a task needs to connect to external tool, we can use connections.
Connections have:
- unique connection ID
- set of parameters (depends on the connection type): login, password, hostname, etc
- encrypted
We can create them with
- Airflow UI
- Environment variables:
AIRFLOW_CONN_MYCONNID='my-conn-type://login:password@host:port/schema?param1=val1' - Airflow Rest API
- Secret Backends
If you cannot see the connection type you want, you’ll have to install the correct provider, e.g. Snowflake
Sensors
Waiting for events
Sensors are a type of operator that checks if a condition is met at a specific interval. If the condition is met, the task is marked successful and the DAG can move to downstram tasks. If the condition isn’t met, the sensors waits for another interval before checking again. Timeout is 7 days by default.
 1from airflow.providers.common.sql.sensors.sql import SqlSensor
 2
 3waiting_for_partner = SqlSensor(
 4  task_id="waiting_for_partner",
 5  conn_id="postgres",
 6  sql="sql/CHECK_PARTNER.sql",
 7  parameters={"name": "partner_a"},
 8  success=_success_criteria,
 9  failure=_failure_criteria,
10  fail_on_empty=False,
11  poke_interval=20,
12  mode="reschedule",
13  timeout=60*5
14)
reschedule mode is better optimized than poke mode. Shorter than 5 minutes, use poke, else use reschedule
Changes to remember between AF2/AF3
- Start date isn’t required anymore
- Logical date is when the DAG starts running
- airflow db migrate to initialize the db
- the catchup parameter is set to False by default
- the webserver is now the API server + dedicated DAG file processor
Extra Features
- DAG versioning
- Event-driven scheduling; you can trigger a DAG through
Assets
Code for certification
start-2026-like-a-pro
#zoomcamp #data-engineering #airflow #data-orchestration #data science #python